

Dungeons Strategy Guide
This page is all about how to run Dungeons: room order, Boss rooms, Buff cards, team roles and recommended builds. For Trinket levels, Crafting and Reforging, continue to the Trinkets page.
- Dungeons are PvE stages. Go to Hot and Cold in the Second Sea or Castle on the Sea in the Third Sea and talk to Lucien to enter the Simulation Hub, or use the Dungeons button in the bottom-right corner of the Server Browser.
- Participants must be Lv.1100, and 2–4 players need to stand on the entrance device together to start.
- Normal has 15 rooms, Hard 20 and Challenge 100; Challenge starts with 15 minutes and adds 30 seconds per room cleared.
- The fixed boss rooms are, in order, Ancient Beast, Kitsune Lord, Gas Knight and Zero; Zero in room 20 only appears on Hard and Challenge.
- Clearing a run gives Trinkets, Simulation Data, materials, Fragments and money; if you want to get stronger, don't just farm fruits — start learning about Trinkets too.
- Once inside, the inventory, shops and stat allocation menus are disabled, so you can't switch fruits, weapons or accessories mid-run; set up your hotbar before entering.
- Dying doesn't fail the whole run; you revive after about 5 seconds and can keep going.
- Dungeon Energy caps at 50, and each entry costs 10.
- Recovers 1 every 9 min 36 sec; refilling from 0 takes about 8 hours.
- Normal is unlocked by default; Hard costs 200 Simulation Data to unlock, and Challenge costs 1,000 Simulation Data.
🧩 Room Counts and Boss Rooms
Dungeons aren't just about raw power. Knowing which floors get harder and where to save your skills makes it less likely you'll suddenly wipe in the last room.
| Difficulty | Rooms | Key tips |
|---|---|---|
| Common | 15 rooms | Practice team roles and card picks first. New teams should start on Normal instead of jumping straight into higher difficulties. |
| Hard | 20 rooms | Enemies are tankier, but the rewards are better too. Ideally the team has at least 1 for reliable mob clearing and 1 for crowd control or filling gaps. |
| Challenge | 100 rooms | Starts with a 15-minute time limit and adds 30 seconds per room cleared; after room 20 no more bosses appear, but enemies become extremely deadly. |
Usual Boss Room Order
| Room | Boss | Quick strategy |
|---|---|---|
| Room 5 | Ancient Beast Lv.3000 |
Transforms below about 30% HP; in phase two the floor is periodically covered in lava, so get to high ground first. |
| Room 10 | Kitsune Lord Lv.3500 |
There are shrines in the four corners of the arena. The boss triggers a mechanic once after transforming and once more at low HP while transformed; quickly destroy the shrines with moves that can break the environment, or the boss may heal a lot or trigger a deadly arena-wide effect. |
| Room 15 | Gas Knight Lv.4000 |
At about 30% HP it absorbs gas from the vents and can fully heal if the fight drags on; destroy the vents right away with moves that can break the environment. After it transforms, its ground lasers hit very hard, so stay airborne to dodge them. |
| Room 20 | Zero Lv.5000 |
Appears in room 20 on Hard and Challenge and uses the reworked Control fruit's abilities. Focus on ranged damage and burst him down while he's locked in place casting moves; only prioritize breaking the floating blocks once they become a threat. |
🃏 How to Pick Buff Cards
After each room you clear, 3 buff cards appear and you pick 1; effects carry over between rooms. Normal stacks up to 15 times and Hard up to 20; in Challenge they keep stacking for every room you actually clear. Don't just pick the card with the most text — focus on what your team is missing right now.
Common Buff Card Effects
| Card | Current effect |
|---|---|
| +500 Stats (+500 to one stat) | Raises the Fighting Style, Sword, Gun or Blox Fruit stat named on the card by 500 points. |
| Cooldown Reduction | Common versions give 15% cooldown reduction for a specific weapon type, or 10% for all moves; choose based on the card text. |
| Skyjumps | Adds 2 extra air jumps; great for dealing with the Kitsune Lord's shrines, the gas vents and ground hazards. |
| Shadow | Every 60 seconds, summons a clone that uses Godhuman to help you attack. |
| 35% HYPER!! (35% faster) | Reduces the normal attack (M1) cooldown of Fighting Styles, Swords and Guns by 35%, and it stacks. |
| Overflow | Gives 3,000 points of extra overflow health, working much like the extra health from Shark V4. |
| Unbreakable | Moves you're charging won't be interrupted when you get hit. |
| Fortress | Grants stun immunity and a 20% chance to reflect damage taken back at 100% of its value. |
| Lifesteal | Heals you when you hit enemies; the card shows 10%, and it stacks. |
| 30% Sniper (guns +30%) | Increases gun damage and range by 30%, and it stacks. |
⚔️ Recommended Fruits, Weapons and Races
Dungeons don't use your normal stat points; Fighting Style, Sword, Gun and fruit damage are all calculated at 2800 points by default, then boosted by the cards you pick up along the way. When choosing gear, prioritize mob clearing, crowd control, survival and boss damage.
| Type | Recommended picks | Why |
|---|---|---|
| Fruits | Buddha, Dragon, Dough, Kitsune, Gas | Buddha clears mobs reliably; Dragon, Dough and Kitsune are good for high damage and crowd control; Gas performs well in both Boss rooms and mob rooms. |
| Backup fruits | Control, Magma, Gravity, Tiger, Werewolf, Yeti | These fruits can fill in crowd control, AoE damage or single-target damage depending on what the team needs. Control works best with experienced teammates. |
| Swords | Fox Lamp, Dragon Trident, Cursed Dual Katana, True Triple Katana | Prioritize weapons with big range, reliable crowd control and short skill end lag. Dungeons aren't a 1v1, so mob-clearing efficiency matters a lot. |
| Guns | Dragonstorm, Skull Guitar, Magma Blaster | Range, crowd control and AoE damage help cover your teammates' gaps. Very useful for hitting mechanics or clearing mobs in separate zones. |
| Races | Human, Draco, Angel, Cyborg, Ghoul | Human leans toward damage, Draco toward defense and team buffs, Angel toward control and healing, while Cyborg and Ghoul suit steady damage. |
👥 Team Roles: Don't Have All Four Players Chase the Same Enemy
- Split up at the start: a 4-player team can agree on left, right, front and back ahead of time instead of crowding into one corner.
- Save your big moves for Boss rooms: if only small mobs are left in the room before, don't burn all your high-damage skills.
- Deal with mechanics first: take out the Kitsune Lord's shrines and the Gas Knight's vents first; don't just stare at the boss's health bar.
- Beginners, stay alive first: if you don't know the map yet, stick with your teammates instead of wandering into another area and going down.
🎁 Rewards and Next Steps
Rewards are paid out all at once when the last room ends, or when the timer runs out on Challenge. Trinkets, money, Simulation Data, random materials and Fragments are based on each player's damage and performance. Trinkets: 1 on Normal, up to 2 on Hard and up to 3 on Challenge. Normal currently gives about 80–90 Simulation Data and Hard about 160–170. Challenge places you in reward tiers based on progress, such as Gold and Platinum; the higher the tier, the better the rewards and the chance of high-quality Trinkets. Since there's no reliable fixed floor-to-tier chart, go by the results screen.
Sources and Naming Notes
Data checked: 2026-07-18. This guide is compiled from English sources, and all game terms use their official English names, such as Buddha, Dough, Trinkets and Simulation Data.
📸 In-Game Screenshots

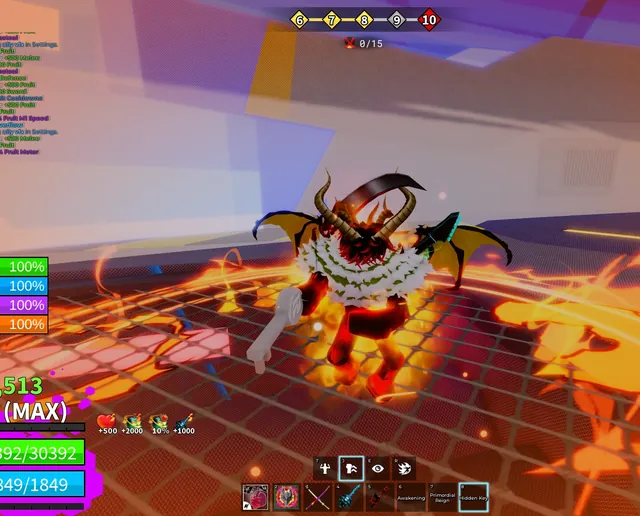

Image source: Blox Fruits Wiki (game screenshots © Gamer Robot Inc.)